
Paiute Deadfall Trap 101
The Paiute Deadfall Trap is the easiest and most effective of all deadfall traps. Understanding and mastering this type of primitive trap is an important component of a survivalist's knowledge base. The Paiute Deadfall is suited to capture small (rodents) to medium (raccoon) sized game depending upon deadfall weight/size.
There are many ways deadfall traps are built, and you will find a number of varying directions on how to assemble one. I encourage everyone to try other methods and trigger systems, but hope to save many the time and trouble of trial and error that inevitably leads to using the Paiute. Follow the instructions and watch the Paiute Deadfall video at the end of this article for further insight.
NOTE: This trap should only be deployed in survival situations. This type of trap results in the death of the prey animal and cannot discriminate between an unfortunate pet or forest animal. As with all trapping activities, be sure to respect your game laws and exercise ethics in the wild.
Trapping, especially in a survival situation, is about more than just building a trap; the true survivalist must plan for location, bait choice, covering human trace, the downside of wild game, and how to find their traps after they've been set.
When discussing survival situations, many people envision themselves in the woods, bunkered up in a comfortable cave or having a tarp wrapped around their sleeping area. Most of these people also dictate that they will have a firearm, generally a rifle, and harvest large game such as deer, hogs, or similar local fare; Reality check, this is not likely to happen when a plane goes down, a car runs out of gas, or a day hike goes bad. You'll be stuck with whatever you have on your person, and that will be what you can rely on until you build or acquire additional tools or find your way back to civilization.
Trapping will be one of the best ways to gather protein in a situation like this. Active hunting only allows you to be in one place at a time, while traps are passive and can be left alone for 12-24 hours. This allows you to "hunt" in multiple locations at the same time, while you can be tending to other needs such as creating shelter, gathering firewood, sourcing water, or scavenging for other resources.
Human scent is a major deterrent to many small animals, so covering your presence in a location is something to be mindful of at all times. Your hands can easily be washed in a local stream using the sediment on bottom to scrub oils and other scents, if water is unavailable, just use sand or dirt to scrub your hands up to you elbows. You want to do this before collecting any pieces to be used for your trap, and periodically throughout the process as you will likely be sweating while working.
Never urinate or defecate in the immediate vicinity of a trap or hunting area, as this is a scent that can linger. And ideally, trap outside of your immediate living area, unless you have heavily used trails as evidence of activity.
When picking locations, look for animal sign, especially in areas with soft dirt or sand, you will often see footprints indicating traffic. To get an idea of how fresh, or how many animals are using an area, sweep the surface with a leafy brush or just drag a stick to clear the area. On your return the following day, count the number of independent trails through the area. If you've set a trap in what appears to be an active area and you return to find that there's no fresh traffic, consider relocating the trap to a different location that is more likely to have live activity. You don't want to use a Paiute Deadfall trap on a trail, because this will be suspect to anything traveling the trail. Setting adjacent to a trail or watering area is a good idea, as you're already in a traveled area of your ideal prey.
When placing traps, be mindful of landmarks that will help you to find them, or consider marking with a broken limb left hanging in a near by tree, small rock cairn, stick/rock arrow that you will be able to see in different lighting; landscapes change with lighting and weather differences, especially areas you are completely new to, and you don't want to forget where you placed a trap. Most small rodents are nocturnal, so you will want to be in the habit of checking your traps in the morning after sunrise, and potentially mid-afternoon, but stay out of your trapping grounds as the sun begins to set and wait until the following morning to return.
An add on to location is what you're using for bait. Don't use something readily available in the area where you are trapping. I used bacon in the video, well, because 'Merica!, but you aren't likely to have bacon with you in the wilderness. If you're setting a trap for a squirrel, don't use an acorn under an oak tree; find an area with different vegetation so that you will have the delicacy. Consider what is likely to attract your ideal prey - remember, some animals are herbivores, some are carnivores, and some are omnivores. When using a meat source (scrap from a prior catch, fish remains, or sourced meat) it is likely that ants will find it in short order, so use more than you might initially think to place in the area. If you can't mount it on the trigger stick directly, place the trigger stick low and place the bait under the stick so that an animal trying to smell or grasp it will bump the stick and trigger the trap.
One last general topic to touch before we get into construction of the trap is some of the downsides of trapping wild game. At any time when harvesting wild game, be aware of disease vectors - these are primarily ticks and fleas, but be alert to this when skinning and cleaning anything you trap. Ideally, your trap will dispatch the prey immediately, but if for some reason you have an animal that is still alive, be alert to movement or sound as you approach the trap and be ready to dispatch with a sharpened stick or club, as removing the deadfall will likely cause the animal to attack you (or retreat) with whatever means it can.

Paiute Deadfall Trigger Parts
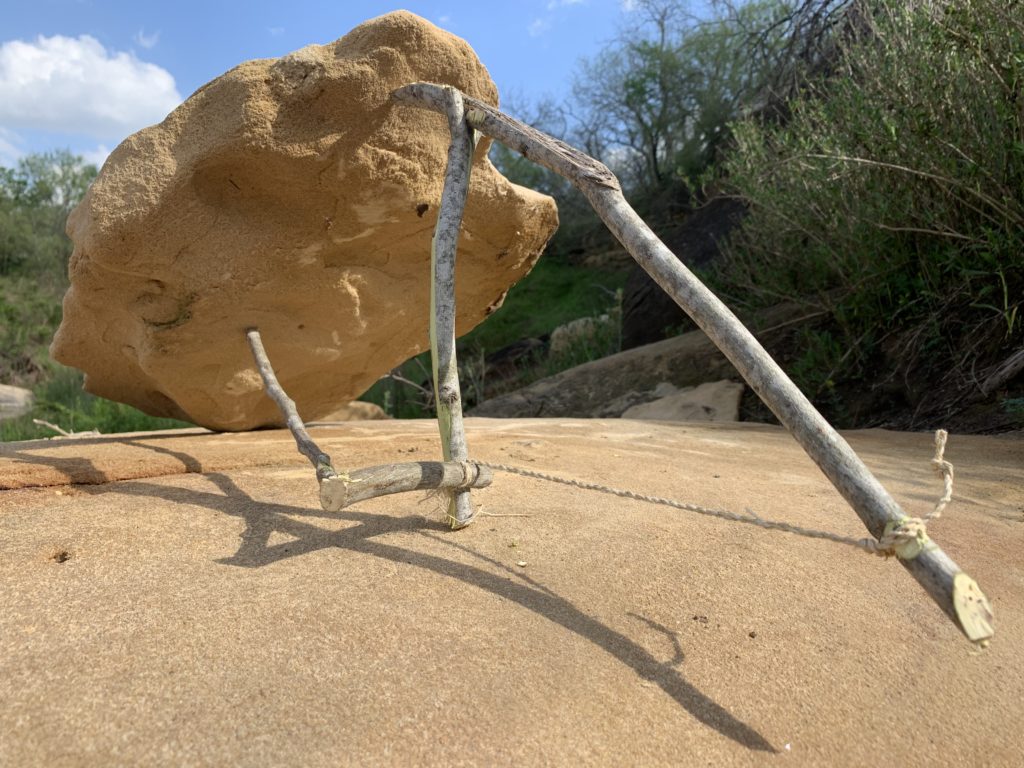
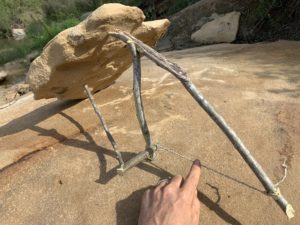
Basic Construction of a Paiute Deadfall Trap consists of a Fulcrum Stick, which serves as the base of the trap, think of it as the pelvis of a human body; a Lever Stick, this is the backbone of the trap, it holds the the deadfall weight in place; a piece of Cordage that ties the lever stick to the toggle stick; the Toggle Stick is the most critical functioning piece of the trap, it will be very "touchy" once it's set up, if it moves, the trap falls; the Trigger Stick holds pressure between the toggle stick and the deadfall weight; the Deadfall Weight is ultimately the trap itself, it must be large enough to trap the target prey and keep it from moving away.
| Supplies: | 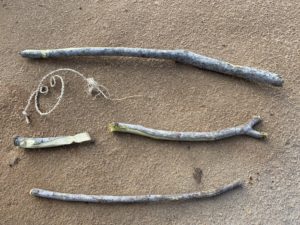 |
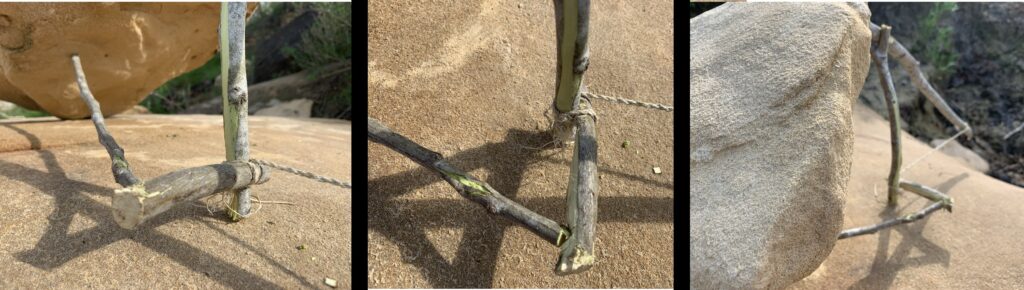
Fulcrum Stick sits against the ground or a small piece of wood or rock if the ground is soft or muddy. This allow it to remain standing upright until the moment the trap is triggered, at which point it will collapse sideways. It needs to have a fork in it naturally, or if it is wide enough, you can carve a rough split in it allowing the lever stick a spot to lean against and articulate with it. It should be tall enough to hold the deadfall at a 25-35º angle to the ground, this is high enough to let the prey get under it and access the bait and trigger stick, but not so high as to give the prey time to get out of the way when the trap is triggered.
 |
 |
Lever Stick is the largest, longest, and strongest piece of the trap system. It will directly hold most of the weight of the deadfall. It should not be pointed down toward the deadfall or level with the ground, it should be positioned at roughly 45º to the ground, with the bottom as close to the ground as possible. I cut a groove in the stick so the string has a point to grab the stick and not slide up or down, causing the trap to trigger itself early.
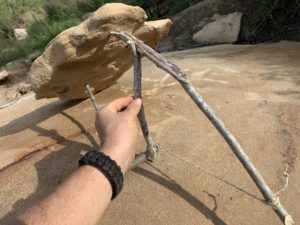
Cordage is an essential piece of this trap, it's the ligament that hold the trap together. Luckily, you can use whatever is available, from pliable vines (may need to braid or twist several strands), fibrous cordage such as yucca as I did in this video (watch these instructions in the Gorge Hook video), or cordage out of everyday objects, as in my Urban Survival Cordage video. The length needed will depend on size of trap, want to keep it as short as possible to minimize the stretch and opportunity for it to break. Before assembly, you will need to tie it to the groove of the lever stick on one end and the toggle stick on the other, but have dimensions of the trap in mind so you don't make it too short. It will be parallel to the ground when trap is built, wrapped around the fulcrum stick and then secured by the short tip of the toggle tucked back under the cordage.
 |
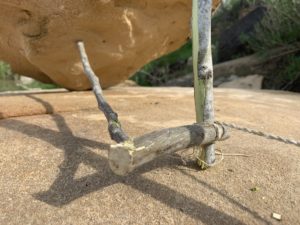 |
Toggle Stick is short and stiff. Should be two to three inches depending on the size of the fulcrum stick, but never much longer. The trigger stick will sit between the deadfall and the toggle stick, keeping the trap balanced until it is tripped. Cut a groove for the cordage to wrap onto it.
Trigger Stick is likely to be the longest stick in the trap. One end rests against the toggle stick, the other will sit against the deadfall rock. Rough up the end against the deadfall rock so it won't slip out of place and trip the trap. Needs to be close enough to the ground that a creature coming by can easily contact it, not up off the ground.
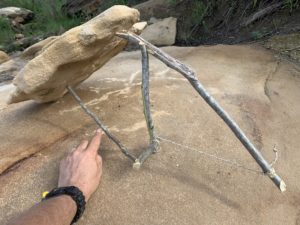 |
Deadfall Rock/Object I refer to this is a rock throughout this article, but it can be any large and heavy object. It should be heavy enough to disable or dispatch the creature quickly, we don't want anything to suffer needlessly. I use flat rocks in this video, but cinder blocks, or even a salvaged tire could be effective if set up correctly. Logs can be used, but be mindful that you're limited to a thinner surface area to contact the ground, so I'd lean away from that unless you don't have any other options.
<name="end" id="end"> Hope you enjoyed this video, comment below and let me know what you think!
[youtube v = "IBg3XSdiUb8" ratio = "16:9"]


